

If you follow my site, you must know that I am a big fan of the Advanced Custom Fields plugin. It is super useful and packed with great features. Previously, I showed how to create and edit posts from the front-end with Advanced custom fields plugin, which has been very useful for many of this website visitors. In this post, I am going to explain how to create a Google Map with multiple dynamic markers using the Advanced Custom Fields plugin for WordPress.

You will need a valid Google Maps API key with billing activated to display the map correctly.
The Scenario
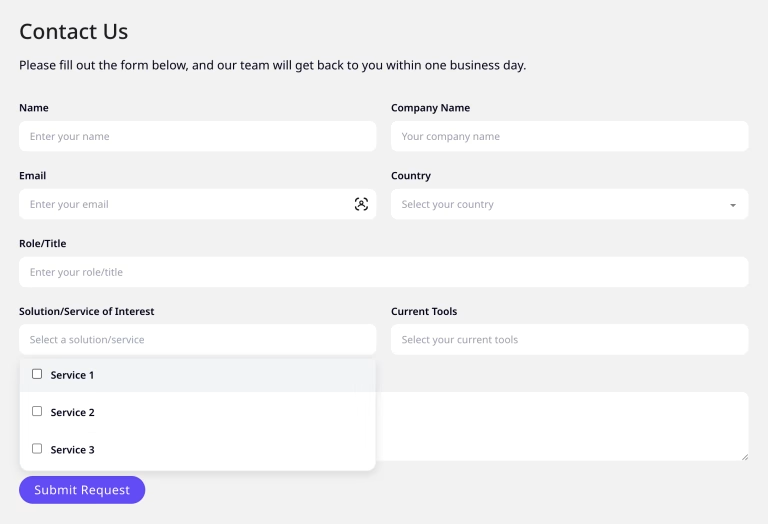
Suppose you are running a business that has multiple outlets throughout the country. You want to showcase all the locations so users can see where they are. Meanwhile, you have some special outlets which have greater inventory so you want to highlight them. There are some other stores that are upcoming and not open to public yet.
So, you end up with 3 (three) type of outlets
- Regular Outlets
- Special Outlets
- Upcoming Outlets
Our plan is to show these three type of outlets with different markers on a map so they appear nice and easy to differentiate.
Initial Setup
For the outlets, we are going to create a custom post type called “Locations”. This is easy to create with a plugin called “Custom Post Types UI”. Or you can add the following code to functions.php file.
<?php

/**
 * Post Type: Locations
 */

function cpt_location() {

  $labels = array(
    "name" => __( "Locations", "text_domain" ),
    "singular_name" => __( "Location", "text_domain" ),
  );

  $args = array(
    "label" => __( "Locations", "text_domain" ),
    "labels" => $labels,
    "description" => "",
    "public" => true,
    "publicly_queryable" => true,
    "show_ui" => true,
    "delete_with_user" => false,
    "show_in_rest" => true,
    "rest_base" => "",
    "rest_controller_class" => "WP_REST_Posts_Controller",
    "has_archive" => false,
    "show_in_menu" => true,
    "show_in_nav_menus" => true,
    "exclude_from_search" => false,
    "capability_type" => "post",
    "map_meta_cap" => true,
    "hierarchical" => false,
    "rewrite" => array( "slug" => "location", "with_front" => true ),
    "query_var" => true,
    "supports" => array( "title" ),
  );

  register_post_type( "location", $args );
}

add_action( 'init', 'cpt_location' );Code language: HTML, XML (xml)
Once we have created the custom post type, you will see a new “Locations” link in your Dashboard.

Now we are going to create a field group with the Advanced Custom Fields (ACF) plugin. I created the fields like the following image. If you need the exact copy, you can download here.

Now, if you head over to add a new location. You will see something like the following image.

Getting Google Maps API
- Head over to https://cloud.google.com/maps-platform/
- Click “Get Started”
- Check Maps & Places then click “Continue”
- Select or Create a Project
- Enable billing for the project you selected or created. You will be asked to “Create Billing Account” if you don’t already have billing information added.
- Once your billing is all set, go to API & Services > Credentials
- Click “Create Credentials” > API key and copy the API key.
- You may set “HTTP referrers” restriction. (optional)
- API Library and enable the following API
- Maps JavaScript API
- Geocoding API
- Places API
- You will need to make sure there is no quota limitation in these API’s. So, go to each of their pages (Maps, Geocoding, Places) and then to the “Quotas” tab and check if all limits are appropriate.
- Now your Google Maps API key is ready to be used.
Setting Google Maps API
Now that we have the Google Maps API key, we need to add to our website. You can simply add the following code to functions.php file to set the Google Maps API key. Don’t forget to add the API key in the mentioned position as indicated!
function my_acf_init() {
    acf_update_setting('google_api_key', 'YOUR_GOOGLE_MAPS_API_HERE');
}
add_action('acf/init', 'my_acf_init');Code language: JavaScript (javascript)
With this added, our map should work fine in the back end. So, we will go ahead and add the location posts we need.
Enqueue Scripts
Now we need to enqueue two scripts. First the Google Maps JavaScript API and then a custom script that we can find at Advanced Custom Fields documentation page for Google Maps Field.
First, create a JavaScript file named gmaps.js in your child-theme folder. If you are going to do this without a child theme (not recommended), you will need to replace get_stylesheet_directory_uri() with get_template_directory_uri() in the following code.
Add the following code to your functions.php file. Replace “YOUR_GOOGLE_MAPS_API_HERE” portion with your API key.
function google_maps_scripts() {
  if (!is_admin()) {
    wp_register_script('googlemapsapi', 'https://maps.googleapis.com/maps/api/js?key=YOUR_GOOGLE_MAPS_API_HERE&callback', array(), '', false);
      wp_enqueue_script('googlemapsapi');

      wp_register_script('gmaps-init', get_stylesheet_directory_uri().'/gmaps.js', array(), '', false);
      wp_enqueue_script('gmaps-init');
  }
}

add_action('wp_enqueue_scripts', 'google_maps_scripts', 100);Code language: PHP (php)
We are loading these scripts only in the front end as we don’t need them in the backend. Hense, using the if statement with is_admin() condition
Now we are going to add the following code to the gmaps.js file we created. This portion of code is slightly modified from the
(function($) {

/*
*  new_map
*
*  This function will render a Google Map onto the selected jQuery element
*
*  @type  function
*  @date  8/11/2013
*  @since 4.3.0
*
*  @param $el (jQuery element)
*  @return  n/a
*/

function new_map( $el ) {

  // var
  var $markers = $el.find('.marker');


  // vars
  var args = {
    zoom    : 16,
    center    : new google.maps.LatLng(0, 0),
    mapTypeId : google.maps.MapTypeId.ROADMAP
  };


  // create map
  var map = new google.maps.Map( $el[0], args);


  // add a markers reference
  map.markers = [];


  // add markers
  $markers.each(function(){

      add_marker( $(this), map );

  });


  // center map
  center_map( map );


  // return
  return map;

}

/*
*  add_marker
*
*  This function will add a marker to the selected Google Map
*
*  @type  function
*  @date  8/11/2013
*  @since 4.3.0
*
*  @param $marker (jQuery element)
*  @param map (Google Map object)
*  @return  n/a
*/

function add_marker( $marker, map ) {
  // var
  var latlng = new google.maps.LatLng( $marker.attr('data-lat'), $marker.attr('data-lng') );
    var icon = $marker.attr('data-img');
  // create marker
  var marker = new google.maps.Marker({
    position  : latlng,
    map     : map,
    icon        : icon
  });

  // add to array
  map.markers.push( marker );

  // if marker contains HTML, add it to an infoWindow
  if( $marker.html() )
  {
    // create info window
    var infowindow = new google.maps.InfoWindow({
      content   : $marker.html()
    });

    // show info window when marker is clicked
    google.maps.event.addListener(marker, 'click', function() {

      infowindow.open( map, marker );

    });
  }

}

/*
*  center_map
*
*  This function will center the map, showing all markers attached to this map
*
*  @type  function
*  @date  8/11/2013
*  @since 4.3.0
*
*  @param map (Google Map object)
*  @return  n/a
*/

function center_map( map ) {

  // vars
  var bounds = new google.maps.LatLngBounds();

  // loop through all markers and create bounds
  $.each( map.markers, function( i, marker ){

    var latlng = new google.maps.LatLng( marker.position.lat(), marker.position.lng() );

    bounds.extend( latlng );

  });

  // only 1 marker?
  if( map.markers.length == 1 )
  {
    // set center of map
      map.setCenter( bounds.getCenter() );
      map.setZoom( 16 );
  }
  else
  {
    // fit to bounds
    map.fitBounds( bounds );
  }

}

/*
*  document ready
*
*  This function will render each map when the document is ready (page has loaded)
*
*  @type  function
*  @date  8/11/2013
*  @since 5.0.0
*
*  @param n/a
*  @return  n/a
*/
// global var
var map = null;

$(document).ready(function(){

  $('.acf-map').each(function(){

    // create map
    map = new_map( $(this) );

  });

        //zoom
      google.maps.event.addListener( map, 'zoom_changed', function( e ) {

          var zoom = map.getZoom();

             if(zoom!= 5)
             {
      var bounds = map.getBounds();

               myLatLngss = [];
                $.each( map.markers, function( i, marker ){
      var myLatLng = new google.maps.LatLng(marker.position.lat(), marker.position.lng() );

      if(bounds.contains(myLatLng)===true) {
                 myLatLngss.push( myLatLng );
          }
          else {

          }
      });
               if(myLatLngss.length > 0)
               {
                 document.cookie = "coordn="+myLatLngss;
                 $("#customzm").load(location.href + " #customzm");
               }
            }

         });
   google.maps.event.addListener(map, 'dragend', function() {
   //alert('map dragged');
   var bounds = map.getBounds();

                  myLatLngss = [];
                $.each( map.markers, function( i, marker ){

      var myLatLng = new google.maps.LatLng(marker.position.lat(), marker.position.lng() );

      if(bounds.contains(myLatLng)===true) {
                 myLatLngss.push( myLatLng );
          }
          else {

          }
           if(myLatLngss.length > 0)
               {
                 document.cookie = "coordn="+myLatLngss;
                 $("#customzm").load(location.href + " #customzm");
               }
      });

 } );


});

})(jQuery);Code language: JavaScript (javascript)
Create Shortcode
We are now going to create a shortcode to show the map. This will be very useful as we will be able to use it almost anywhere. So, add the following code to your functions.php file.
// Locations Map Shortcode - [locations_map]

function locations_map (){

    $args = array(
        'post_type' => 'location',
        'posts_per_page' => -1,
    );

    $locations_query = new WP_QUERY($args);

    if ( $locations_query->have_posts() ) {

    ob_start(); ?>

    <div class="acf-map" style="overflow: hidden; position: relative;">

      <?php while ( $locations_query->have_posts() ) {
        $locations_query->the_post();
        $address = get_field('address');
        $title = get_the_title();
        $outlet_type = get_field('outlet_type');
        $phone = get_field('phone');

            if ($outlet_type == 'regular') {
                $type_icon = get_stylesheet_directory_uri().'/images/green-marker.png';
                $outlet_text = 'Regular Outlet';
            } elseif ($outlet_type == 'special') {
                $type_icon = get_stylesheet_directory_uri().'/images/red-marker.png';
              $outlet_text = 'Special Outlet';
            } else {
              $type_icon = get_stylesheet_directory_uri().'/images/gray-marker.png';
              $outlet_text = 'Upcoming Outlet';
            }

        ?>

        <div class="marker" data-lat="<?php echo $address['lat']; ?>" data-lng="<?php echo $address['lng']; ?>" data-img="<?php echo $type_icon; ?>">
            <div class="inside-marker">
              <h5><?php echo $title; ?></h5>
              <?php
                  echo $outlet_text.'<br>';
                  if($phone) {
                   echo 'Phone: '.$phone;
                  }
              ?>
          </div>
        </div>

    <?php } ?>
    </div>

    <?php wp_reset_postdata();

    }

    return ob_get_clean();

}

add_shortcode( 'locations_map', 'locations_map' );Code language: JavaScript (javascript)
In this code portion, we doing a query to get all the posts from location custom post type. Then we are adding data from the posts inside the loop. The div
The variable $type_icon holds info about the marker image that is used in
We will need to upload 3 image files called red-marker.png, green-marker.png and gray-marker.png. These will need to be uploaded to the images folder in our child theme as indicated in our code. For non-child theme users, you will need to replace get_stylesheet_directory_uri() with get_template_directory_uri() as done previously.
CSS and Animation
We need to add the following CSS code in our theme (or plugin if you use any). Most themes allow adding Custom CSS in Appearance > Customize > Additional CSS. You may tweak the code to your preference.
.acf-map {
    width: 100%;
    height: 700px;
    border: #ccc solid 1px;
    margin: 20px 0;
}Code language: CSS (css)
Finally, use the shortcode [locations_map] to a page or post and check your beautiful map!
The Output

Troubleshooting
This is a fairly complex project and it is very normal to get into errors. The most issues will be from Google Maps API. Google Cloud Console gets changed every now and then and you might see the steps are different but they should be very similar.
Watermarked “for development purposes only” error will most likely be shown if:
- You did not use the API correctly
- Your account is not billing enabled
- A self-imposed quota/limit is set in your API
- Your billing is no longer valid
- Conflicting plugins/themes
- JavaScript errors
Hopefully you will not run into any of these. Good Luck!

22 comments
Raymond
Works great! Exactly what I was looking for! Thanks!
One question, I can not accomplish to close the marker window when I click another marker window. Any idea’s on this?
Liz
If I want to have users enter location and then display on a map but in 2 different color markers, example if there is a lost and found map and I want to see lost in one color and found in another color, but on the same map, by different users, so it’s dynamic, and updated each time users add entries, how can I make this work? Currently using acf in elementor – please advice?
Al-Mamun Talukder
This article is very close to what you want. Not sure where you are getting stuck. Let me know if you need help.
Max
Hello,
This is a great guide. When I tried to implement this for my site, the end result was a thin box border where the map should be (from the css) and a text list with the output variables but no map. When I inspected the page it showed that all the data is being pulled correctly and there but I could not figure out how to get the map to display. I originally tried to customize your post to what I needed and got that result but I also copied and pasted the exact code to my files and got the same problem. If you have seen this problem before or have any idea what may be causing it please let me know. I greatly appreciate the help and thank you for this great guide.
Al-Mamun Talukder
Hello Max. Please try switching to the default theme and check if it works. Make sure there is no conflict in CSS. You may also share the URL so that I can have a look (through the contact page if not here). Thanks.
Bryan
Hello Al-Mamun – this is a great template! It will do exactly what I want, except that I am having an issue with my Google Maps API key. I am trying to select an address, but every time it gives me a “Location not found: REQUEST_DENIED” in the wp-admin and “Geocoding Service: This API project is not authorized to use this API” in the console. The API Key should be working properly; I have another map that is using it and it works fine, and I’ve even created a new key to see if there was an issue there. It seems like this should be working, but was hoping you had any insight into this because I really enjoy this custom post type.
Thanks!
Al-Mamun Talukder
Hello Bryan. Please check if you have an quota set on your account. It’s very frustrating that Google keeps changing the UI so the step keep changing. You may also check if the API is working at the back-end.
George
Hi,
It seems like this is tutorial for showing all markers of all posts. Do you have a tutorial for adding multiple markers from single post editor?
Thanks in advance!
Al-Mamun Talukder
Hi George, You can simply edit the query to what you want and it should work accordingly. In the tutorial, I am using WP_Query to get a certain post type posts and showing them on the map. In your case if you want to show a repeater field, you will need to configure the loop that way.
Kurt K.
First go around with this I had issues that I discovered were related to wordpress debug mode being set to true. I would be curious for the author of the code to turn on debug and see some of the issues that came up for me and if there is a way to resolve these issue that were flagged by debug. Thank You!
Al-Mamun Talukder
Hello Kurt. I did not see any error (checked again). Please check if you have any conflicts with plugin or theme.
Sam
I keep getting JS errors such as;
“Uncaught (in promise) TypeError: Cannot read property ‘firstChild’ of null”
and
“myLatLngss is not defined”
I’ve followed the tutorial right, but the map shows with just a single marker in the ocean….
Al-Mamun Talukder
Hello Sam. These codes still work. Please double check everything and if you are still facing problem, try doing it on a fresh install of WordPress with the default theme. Contact me via the contact form if needed. Thanks
Tiffany Anderson
This is absolutely fantastic and exactly what I needed. I do have one question: I need to be able to hover to have the infowindow show up and stay open until hovering elsewhere.. is there a way to do this? I tried making the infowindow the listener but apparently that isn’t an event that will work with the infowindow.
Ashley Cameron
I have a similar question. I’ve built a couple of Google Maps with multiple markers in the past and haven’t figured out how to close pop-ups when clicking elsewhere. The pop-ups stay open until you manually close them. Any idea how to make them close when clicking on another marker or anywhere on the map?
Hasibul Amin Hemel
Hi,
Can you give an example to use user location with zoom level and show the locations marker within that radius?
Thanks
Al-Mamun Talukder
You will have to change the Query. Instead of querying custom post type as shown here, query for the users. Find out more here https://codex.wordpress.org/Class_Reference/WP_User_Query
Alexandra
Hi, thanks a lot its very helpfull.
I didn’t succeed adding cluster marker. I tried to add on your code :
var markerCluster = new MarkerClusterer(map, markers,
{imagePath: ‘https://developers.google.com/maps/documentation/javascript/examples/markerclusterer/m’});
but it didn’t work. Do you know where I have to put the code ?
Thanks a lot
Al-Mamun Talukder
Hi Alexandra. I did not try cluster marker yet for this. I will take a look and update the article if it works out. Thanks.
Yoram
Wow
Brilliant simple and efficient explanation
help me to close a task i didn’t know how to start with
I mostly liked the approach of Troubleshooting – Thank You
DanO
It would be nice to have a demo of the output first to see if the functinality built in to the solution is what I need. For instance, when zooming out, do the markers appear if they were off screen. This would also be a good way to get feature feedback for the article.
Al-Mamun Talukder
Thanks for your feedback. I agree that a demo is always better however, as the new Google API for maps is not free, I cannot have it as a public demo. It’s a very short setup and fairly easy to do so, I will suggest you to try it.